Tutorial: Kinesis Firehose Data Transformation with Terraform and Java
- JP

- Apr 13, 2023
- 8 min read

Introduction
AWS provides different ways to transform data through its services and one of my favorites is Kinesis Firehose Data Transformation. This is a strategy for transforming data by leveraging the stream service to deliver data to a destination.
For this tutorial, we're going to use the strategy below. Kinesis Firehose will send data, and instead of writing it to the S3 bucket, it will invoke a Lambda to transform that data and then send it back to Kinesis Firehose which will deliver the same data to S3.

Creating project
For this post we'll use Java as language and Maven as a dependency manager. Therefore, it's necessary to generate a Maven project that will create the structure of our project.
If you don't know how to generate a Maven project, I recommend seeing this post where I show how to generate it.
Project structure

After generating the Maven project and importing it into your IDE, we're going to create the same files and packages on the side, except for the pom.xml that was created by the maven generator.
Inside the java/ folder, create a package called coffee.tips.lambda and also create a Java class called Handler.java inside this same package.
Now, create a package called model inside coffee.tips then, create two java classes:
Record.java
Records.java
Lastly, create a new package called status and also create an enum called Status.
Creating Record Class
Why do we need to create Record class?
Kinesis Firehose expects an object as return, containing the above fields. This happens when Kinesis Firehose invokes Lambda to transform data and the same Lambda must return an object containing these filled fields.
recordId
This field value must contain the same id from Kinesis record ID
result
This field value controls the transformation status result. The possible values are:
Ok: Record successfully transformed.
Dropped: Record dropped intentionally according to your processing logic.
ProcessingFailed: Data could not be transformed.
data
The transformed data payload, after data be encoded to base64.
This model must contain these following parameters. Otherwise, Kinesis Firehose rejects it and sets it as data transformation failure.
Creating Records Class
Records class will be our response Java class containing a list of Record type.
Creating Status Enum
I decided to create the Enum above just to create an elegant code, but it's useful when we need to map different values for specific context. This Enum will be used in our logic code to transform data.
Creating Handler Class
The Handler class will be our controller for the Lambda. This Lambda will be invoked by Kinesis Firehose passing some parameters containing the data to be transformed.
Note that, for the handleRequest method, a parameter called input of KinesisFirehoseEvent type contains records sent by Kinesis Firehose and the same method will return an object of Records type containing a list of records that later be sent back to Kinesis Firerose delivering to the S3.
Within iteration using Java Stream, we create some conditions just to explore how the result field works. Depending on condition, we set the result value to Dropped, which means the data won't be delivered to Kinesis Firehose. Otherwise, for those that were set to Ok, the data will be sent to Kinesis Firehose.
Another detail is that you can change values during execution. We set "TECH" as the value for TICKER_SYMBOL field when the SECTOR value is TECHNOLOGY. It's a way to transform data.
Finally, two other methods were created just to decode and encode data as a requirement for the processing to work well.
Updating pom.xml
After generating our project via Maven, we need to add some dependencies and a maven plugin to package the code and libraries for deployment. Following the pom.xml content below.
Creating resources with Terraform
Instead creating the Kinesis Firehose, Lambda, policies and roles manually via console, we're going to create via Terraform. If you don't know much about Terraform, I recommend seeing this tutorial Getting started using Terraform om AWS.
Inside terraform folder, create the following files:
vars.tf content
vars.tf file is where we declare the variables. Variables provides flexibility when we need to work with different resources.
vars.tfvars content
Now we need to set the values of these variables. So, let's create a folder called /development inside the terraform folder.

After folder creation. Create a file called vars.tfvars like side image and paste the content below.
Note the for bucket field, you must specify the name of your own bucket. Bucket's name must be unique.
main.tf content
For this file, we just declare the provider. Provider is the cloud service where we're going to use to create our resources. In this case, we're using AWS as provider and Terraform will download the necessary packages to create the resources.
Note that for region field, we're using var keyword to assign the region value already declared in vars.tfvars file.
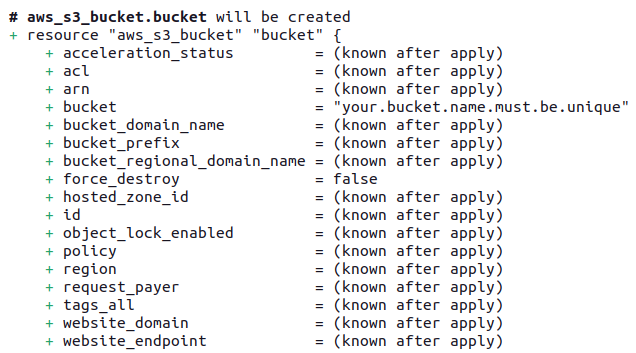
s3.tf content
This file is where we're declare resources related to S3. In this case, we only create S3 bucket. But, if you want to create more S3 related features like policies, roles and etc, you can declare it here.
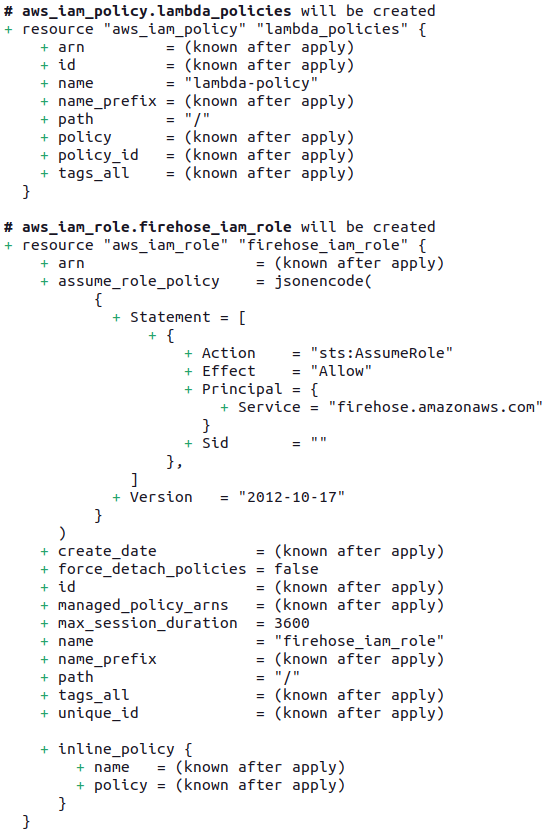
lambda.tf content
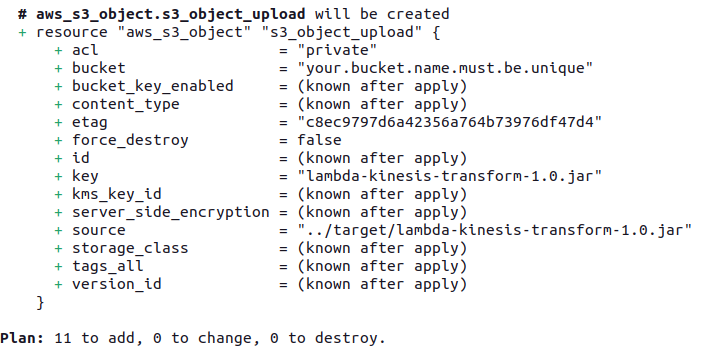
The content below will be responsible for creating AWS Lambda and its roles and policies. Note that in the same file we created a resource called aws_s3_object. It's a strategy to upload the Jar file directly to S3 after packaging. Maintaining some files on S3 is a smart way when we have large files.
Understanding lambda.tf content
1. We declared aws_iam_policy_document data sources that describes what actions the resources that will be assigned to these policies can perform.
2. aws_iam_role resource that provides IAM role and will control some Lambda's actions.
3. We declared aws_s3_object resource because we want to store our jar file on S3. So, during the deploy phase, Terraform will get the jar file that will be created on target folder and uploading to S3.
depends_on: Terraform must create this resource before the current.
bucket: It's the bucket's name where will store the jar file.
key: jar's name.
source: source file's location
etag: triggers updates when the value changes
4. aws_lambda_function is the resource responsible to create Lambda and we need to fill some fields such as:
function_name: Lambda's name.
role: Lambda role declared in previous steps that provides access to AWS services and resources.
handler: In this field you need to pass main class directory.
source_code_hash: This field is responsible to trigger lambda updates.
s3_bucket: It's the bucket's name where also will store the jar file generated during deploy.
s3_key: Jar's name.
runtime: Here you can set the programming language supported by Lambda. For this example, java11.
timeout: Lambda's timeout of execution.
5. aws_iam_policy provides IAM policies for the resources where we define some actions to be performed. In this case, we define actions such as Lambda invocation and CloudWatch logging.
6. For aws_iam_role_policy_attachment resource, we can attach IAM policies to IAM roles. In this case, we attached lambda_iam_role and lambda_policies previously created.
7. Finally, we have aws_lambda_permission resource, we need this resource to give Kinesis Firehose permission to invoke Lambda.
kinesis.tf content
Understanding kinesis.tf content
1. We declared aws_kinesis_firehose_delivery_stream resource and its fields, following the details:
destination: That's the destination itself, Kinesis provides a mechanism to deliver data to S3 (extended_s3), Redshift, Elasticsearch (OpenSearch service from AWS), splunk and http_endpoint.
name: Kinesis Firehose name
depends_on: Kinesis Firehose will be created if S3 Bucket already exists.
extended_s3_configuration:
1. bucket_arn: S3 Bucket setting with arn.
2. role_arn: ARN role.
3. prefix: S3 Bucket folder where data will be stored.
You can specify time format using the following expressions,
"/year=! {timestamp:yyyy}/month=!{timestamp:MM}/".
4. error_output_prefix: For this field, you can define a path to store the process failure results.
5. buffer_interval: Kinesis Firehose buffer to deliver data through a specific interval.
6. buffer_size: Kinesis Firehose buffer to deliver data through a specific size. Kinesis Firehose has the both options to handle buffer.
7. compression_format: There are some compression format options like ZIP,
Snappy, HADOOP_SNAPPY and GZIP. For this tutorial, we chose GZIP.
processing_configuration: That's the block where we define which resource will be processed. For this case, AWS Lambda.
1. enabled: true to enable and false to disable.
2. type: Processor's type.
3. parameter_value: Lambda function name with arn.
2. We declared aws_iam_policy_document data sources that describes what actions the resources that will be assigned to these policies can perform.
3. aws_iam_role resource that provides IAM role to control some Kinesis actions.
4. aws_iam_policy provides IAM policies for the resources where we define some actions to be performed. In this case, we define S3 and some Lambda actions.
5. For aws_iam_role_policy_attachment resource, we can attach IAM policies to IAM roles. In this case, we attached firehose_iam_role and firehose_policies previously created.
Packaging
We've created our Maven project, Handler class with Java and Terraform files to create our resources on AWS. Now, let's run the following commands to deploy the project.
First, open the terminal and be sure you're root project directory and running the following maven command:
mvn package
The above command will package the project creating the Jar file to be deployed and uploaded to S3. To be sure, go and check target folder and see that some files were created including lambda-kinesis-transform-1.0.jar file.
Running Terraform
Now, let's run some Terraform commands. Inside terraform folder, run the following commands on terminal:
terraform initThe above command will initiate terraform, downloading terraform libraries and also validate the terraform files.
For the next command, let's run the plan command to check which resources will be created.
terraform plan -var-file=development/vars.tfvarsAfter running, you'll see similar logs on console:


Finally, we can apply to create the resources through the following command:
terraform apply -var-file=development/vars.tfvarsAfter running, you must confirm to perform actions, type "yes".

Now the provision has been completed!

Sending messages
Well, now we need to send some messages to be transformed and we're going to send them via Kinesis Firehose console. Obviously there are other ways to send it, but for this tutorial we're going to send through the easiest way.
Open the Kinesis Firehose console, access the Delivery Stream option as shown in the image below.

In the Test with demo data section, click to Start sending demo data button.

After clicking, the messages will be sent through Kinesis Firehose and according to buffer settings, Kinesis will take 2 minutes to deliver the data or if it reaches 1 MIB of data amount.
Let's take a look to our Lambda and see the metrics:


Click on the Monitor tab then Metrics option and note that Lambda has been invoked and there's no errors.

Transformed data results
Now that we know everything is working fine, let's take a look at the transformed data directly on Amazon S3. Go and access the created S3 Bucket.

Note that many files were created. Let's read one of them and see the transformed data.

Choose a file like as in the image below and click on the Actions button and then on the Query with S3 Select option.

Following the selected options in the image below, click on Run SQL query button to see the result.


Based on above image you can see that according to Handler.java which we defined an algorithm to drop data with CHANGE field value less than zero and for those with SECTOR field value equals TECHNOLOGY we would set TICKER_SYMBOL field value to TECH.
This was an example of how you can transform data using Kinesis Firehose Data Transformation and Lambda as an inexpensive component to transform data.
Stop Sending messages
You can stop sending messages before destroying the created resources via Terraform looking to save money. So, just go back to the Kinesis Firehose console and click on Stop sending demo data button.
Destroy
AWS Billing charges will happen if you don't destroy these resources. So I recommend destroying them by avoiding some unnecessary charges. To avoid it, run the command below.
terraform destroy -var-file=development/vars.tfvarsRemember you need to confirm this operation, cool?
Conclusion
Kinesis Firehose definitely isn't just a service to deliver data. There's flexibility integrating AWS services and the possibility to deliver data to different destinations making data transformation and applying logic according to your use case.
Github repository
Books to study and read
If you want to learn more about and reach a high level of knowledge, I strongly recommend reading the following book(s):
AWS Cookbook is a practical guide containing 70 familiar recipes about AWS resources and how to solve different challenges. It's a well-written, easy-to-understand book covering key AWS services through practical examples. AWS or Amazon Web Services is the most widely used cloud service in the world today, if you want to understand more about the subject to be well positioned in the market, I strongly recommend the study.
Setup recommendations
If you have interesting to know what's my setup I've used to develop my tutorials, following:
Well that’s it, I hope you enjoyed it!


https://xembong24h.live/ mình thấy bạn bè nhắc mấy lần nên bấm vào coi thử cho biết. Không phải kiểu fan cày hết trận này tới trận kia đâu, mình chỉ muốn xem trang có dễ dùng không. Vào cái là thấy giao diện làm khá thoáng, bố cục chia theo từng khối nên lướt xuống không bị “ngợp” chữ. Mình để ý phần thông tin thể thao cập nhật khá nhanh, nhìn sơ là nắm được lịch với tình trạng trận đang chạy mà không cần bấm vòng vòng. Trên điện thoại cũng ổn, chữ với khung nội dung nhìn rõ, không bị dính tùm lum. Nói chung hợp kiểu mở lên xem nhanh, và mình thích cách họ sắp xếp…