Running Spring Boot with ActiveMQ
- JP

- Jan 30, 2021
- 6 min read
Updated: Mar 24, 2023

Before understanding about ActiveMQ, we have to think about common problems in applications that need to scale and better integrate their services. Today the information transmitted flow is infinitely greater than 10 years ago and it is almost impossible to measure capacity in terms of scalability that an application can support.
Use case
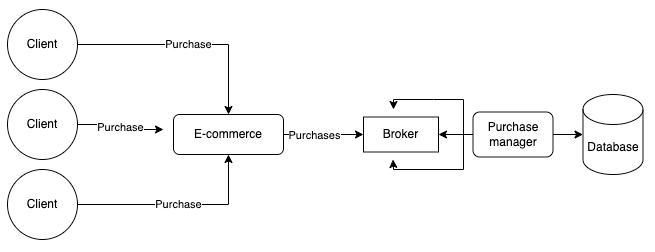
To understand better, let's imagine that you were hired to design an architecture for an e-commerce that will sell tickets for NFL games. As always you have little time to think about an architecture. The first idea is simple and quick, the result is this drawing below.

Thinking about the number of accesses and requests per second, do you think it is a resilient architecture? Does the database scale? Does the bank support multi-access? And if the bank for some reason falls down, will the purchase be lost? We can improve this architecture a little more, making it a little more professional and resilient. Let's go.
Let's understand this last drawing. Now, when placing a purchase order, the orders are sent to a message server (Broker). The idea of the Broker is basically a service capable of allocating messages. These are usually texts or text in Json format. In this drawing we can say that the Queue allocates customer data, number of tickets, values, etc.
And finally, there is an application that does all the management of orders/purchases. This application reads/removes messages from the Broker and can perform validations before writing to the database.
Now, let's assume that one of the requirements is for each sale, the customer must receive an invoice for the ticket. As the new architecture is well decoupled, it's easier to "plug in" a new application to do this job. Then you thought of a new design, follow:
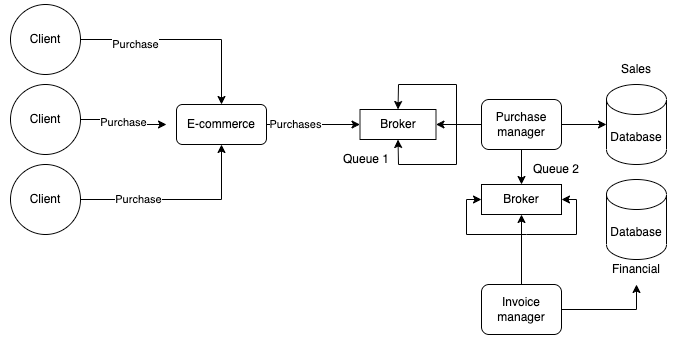
Now the application that manages the purchases, in addition to recording the sale after retrieving the messages in Queue 1, it also sends a message to Queue 2, where it will allocate the customers' invoices. And a new application that manages invoices retrieves these messages and records them on a specific database for the financial area.
But what are the benefits of this new architecture? The architecture is more resilient, asynchronous and fault-tolerant. In case of, one of the applications fails for some reason, the message returns to the queue until the applications are reestablished. And finally, it facilitates the integration of new applications.
What about ActiveMQ? What does he have to do with it? ActiveMQ is the service that provides the messaging server. In the design, it would be the message servers (Brokers).
To understand even better, let's create a practical example of how to configure and use ActiveMQ with Spring Boot and JMS.
Creating the Project
To create this Spring Boot project we're going to use Spring Initializr to generate our project faster. Therefore, access the following https://start.spring.io to create it and choose the dependencies.
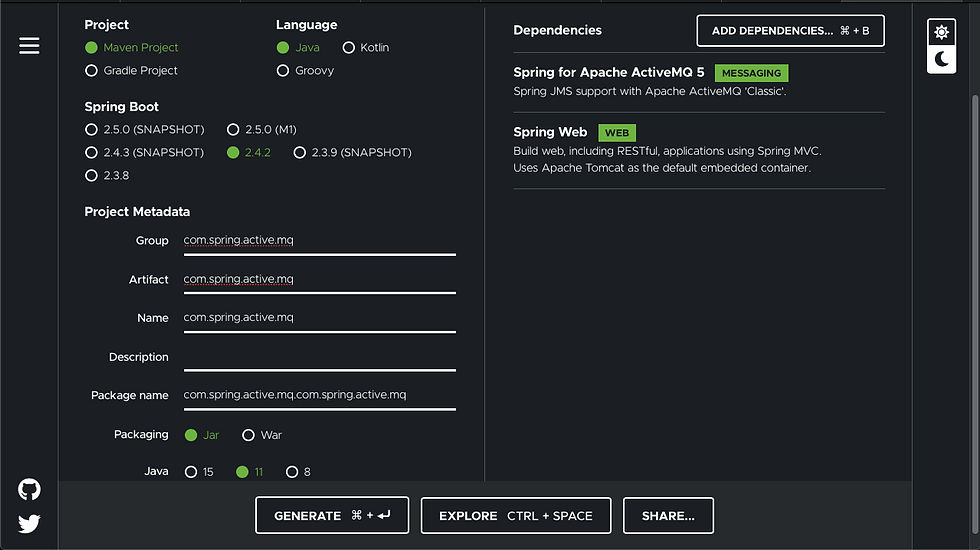
Fill in the fields and select the 2 dependencies (ActiveMQ 5 and Spring Web) as shown in the image. Generate the file and import it into your project.
Pom file
Following the pom.xml that was created by Spring Initializr.
<?xml version="1.0" encoding="UTF-8"?>
<project xmlns="http://maven.apache.org/POM/4.0.0" xmlns:xsi="http://www.w3.org/2001/XMLSchema-instance"
   xsi:schemaLocation="http://maven.apache.org/POM/4.0.0 https://maven.apache.org/xsd/maven-4.0.0.xsd">
   <modelVersion>4.0.0</modelVersion>
   <parent>
      <groupId>org.springframework.boot</groupId>
      <artifactId>spring-boot-starter-parent</artifactId>
      <version>2.4.2</version>
      <relativePath/> <!-- lookup parent from repository -->
   </parent>
   <groupId>com.spring.active.mq</groupId>
   <artifactId>spring-boot-active-mq</artifactId>
   <version>0.0.1-SNAPSHOT</version>
   <name>spring-boot-active-mq</name>
   <description>Demo project for Spring Boot</description>
   <properties>
      <java.version>1.8</java.version>
   </properties>

   <dependencies>
      <dependency>
         <groupId>org.springframework.boot</groupId>
         <artifactId>spring-boot-starter-activemq</artifactId>
      </dependency>
      <dependency>
         <groupId> org.springframework.boot</groupId>
         <artifactId>spring-boot-starter-web</artifactId>
      </dependency>
      <dependency>
         <groupId>org.springframework.boot</groupId>
         <artifactId>spring-boot-starter-test</artifactId>
         <scope>test</scope>
      </dependency>
   </dependencies>

   <build>
      <plugins>
         <plugin>
            <groupId>org.springframework.boot</groupId>
            <artifactId>spring-boot-maven-plugin</artifactId>
         </plugin>
      </plugins>
   </build>
</project>
Installing ActiveMQ
Let's download ActiveMQ to make the process more transparent. But there is also the possibility of using the built-in version of Spring Boot, but this time we will present it in a more traditional way. For this example, we're going to use the classic version of ActiveMQ.
Download ActiveMQ here: https://activemq.apache.org/components/classic/download/
Steps to install here: https://activemq.apache.org/getting-started
After installation, start the server according to the documentation.
application.properties file
In the created Spring-Boot application, fill in the application.properties file
spring.activemq.broker-url=tcp://127.0.0.1:61616
spring.activemq.user=admin
spring.activemq.password=admin
The first line sets the messages server URL
The second and subsequent lines are the authentication data.
Ticket class
public class Ticket {

    private String name;
    private Double price;
    private int quantity;

    public Ticket(){}

    public Ticket(String name, Double price, int quantity){
        this.name = name;
        this.price = price;
        this.quantity = quantity;
    }

    public String getName() {
        return name;
    }

    public void setName(String name) {
        this.name = name;
    }

    public Double getPrice() {
        return price;
    }

    public void setPrice(Double price) {
        this.price = price;
    }

    public int getQuantity() {
        return quantity;
    }

    public void setQuantity(int quantity) {
        this.quantity = quantity;
    }

    @Override
    public String toString() {
        return String.format("Compra de ingresso -> " +
                "Name=%s, Price=%s, Quantity=%s}",
                getName(), getPrice(), getQuantity());
    }
}
In the SpringBootActiveMqApplication class previously created by the generator, make the following change.
@SpringBootApplication
@EnableJms
public class SpringBootActiveMqApplication {

   public static void main(String[] args) {
      SpringApplication.run(SpringBootActiveMqApplication.class, args);
   }

   @Bean
   public JmsListenerContainerFactory<?> defaultFactory(
           ConnectionFactory connectionFactory,
            DefaultJmsListenerContainerFactoryConfigurer configurer) {

      DefaultJmsListenerContainerFactory factory =
                new DefaultJmsListenerContainerFactory();
      configurer.configure(factory, connectionFactory);
      return factory;
   }

   @Bean
   public MessageConverter jacksonJmsMessageConverter() {
      MappingJackson2MessageConverter converter =
                new MappingJackson2MessageConverter();
      converter.setTargetType(MessageType.TEXT);
      converter.setTypeIdPropertyName("_type");
      return converter;
   }
}
The @EnableJms annotation is the mechanism responsible for enabling JMS.
The defaultFactory method configures and registers the factory to connect the queues using JMS.
And finally, the jacksonJmsMessageConverter method converts the messages passed from JSON to the type that will be passed in the JmsTemplate that we will see soon. All of these methods use the @Bean annotation. Methods annotated with @Bean are managed by the Spring container.
TicketController class
In the TicketController class, we create a method called buyTicket that will be responsible for sending messages to the queue called compra_queue (purchase_queue) through a POST request. In this method we're using a JmsTemplate type object that allows objects to be converted and sent to the queue using JMS.
package com.spring.active.mq.springbootactivemq.Controller;

import com.spring.active.mq.springbootactivemq.pojo.Ticket;
import org.springframework.beans.factory.annotation.Autowired;
import org.springframework.http.MediaType;
import org.springframework.jms.core.JmsTemplate;
import org.springframework.web.bind.annotation.PostMapping;
import org.springframework.web.bind.annotation.RequestBody;
import org.springframework.web.bind.annotation.RestController;

@RestController
public class TicketController {

    @Autowired
    private JmsTemplate jmsTemplate;

    @PostMapping(value = "/buy",
    consumes =  MediaType.APPLICATION_JSON_VALUE)
    public void buyTicket(@RequestBody Ticket ticket){
        jmsTemplate.convertAndSend("compra_queue",
                new Ticket(ticket.getName(),
                        ticket.getPrice(),
                        ticket.getQuantity()));
    }
}
EventListener class
The EventListener class is a sort of "listener". The @JmsListener annotation defines this listener characteristic. In this same annotation, it is possible to configure the queue's name that will be "listened to" by the method. In short, all messages sent to the queue compra_queue (purchase_queue) will be received by this method.
package com.spring.active.mq.springbootactivemq.listener;
import com.spring.active.mq.springbootactivemq.pojo.Ticket;
import org.springframework.jms.annotation.JmsListener;
import org.springframework.stereotype.Component;
@Component
public class EventListener {
@JmsListener(destination = "compra_queue",
containerFactory = "defaultFactory")
public void receiveMessage(Ticket ticket) {
System.out.println("Mensagem da fila:" + ticket);
}
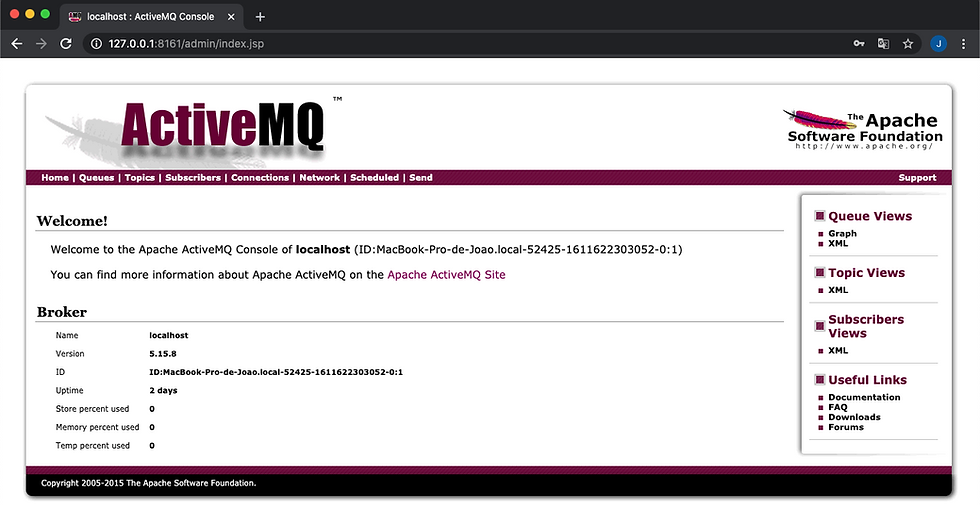
}Accessing Broker service - ActiveMQ
After starting the service according to the documentation, access the service console through a browser http://127.0.0.1:8161/
Creating queue
To create the queue, click on the Queues option on the top red bar, as shown in the image below.
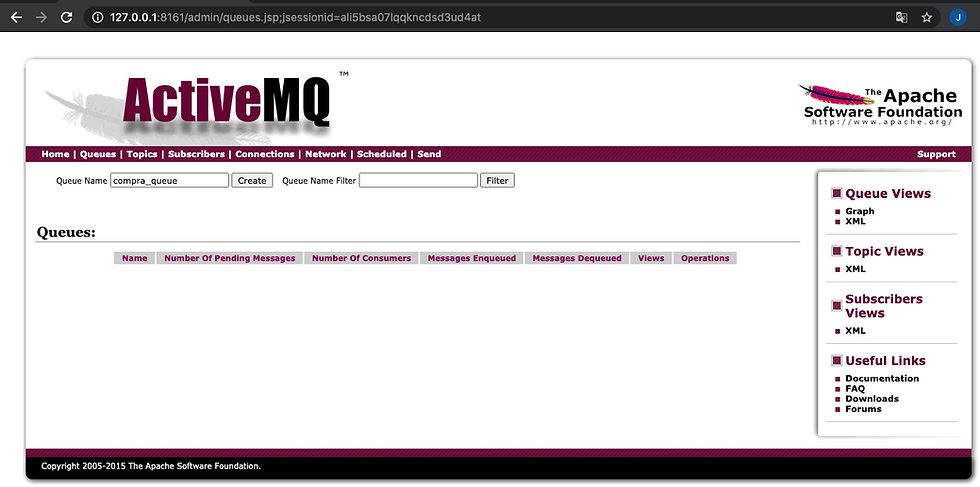
In the Queue Name field, type the queue's name as shown in the image above and click on the Create button.
It's done, queue was created!
Starting application
Via terminal, access your project directory and run the Maven command below or launch via IDE
mvn spring-boot:runSending messages
We will use Postman to send messages, if you don't have Postman installed, download it by accessing this link https://www.postman.com/downloads/
After installation, access Postman and fill in the fields as shown in the image below.
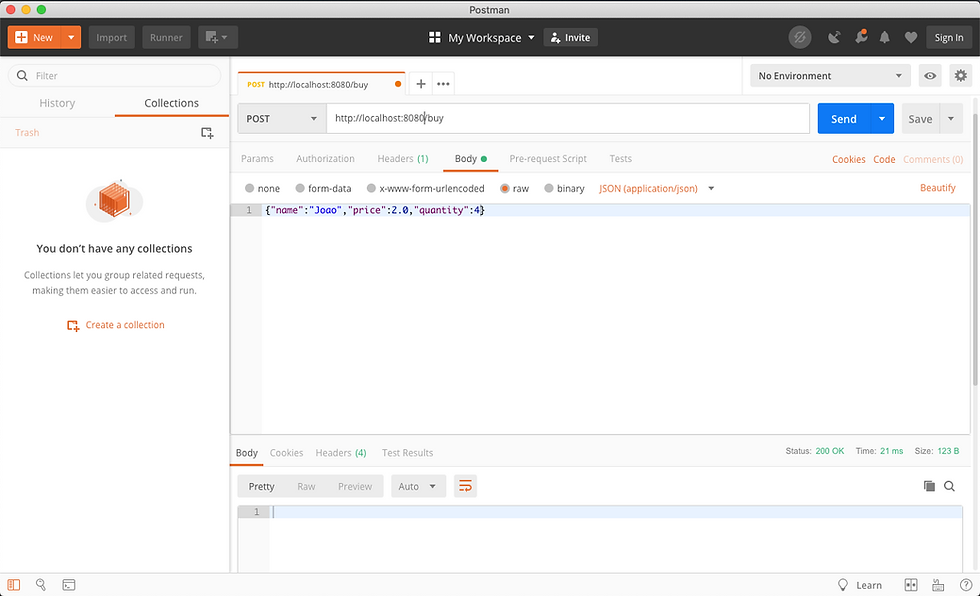
Json content
{"name":"Joao","price":2.0,"quantity":4}By clicking on the Send button, access the application's console and it will be possible to view the message sent and transmitted in the queue.

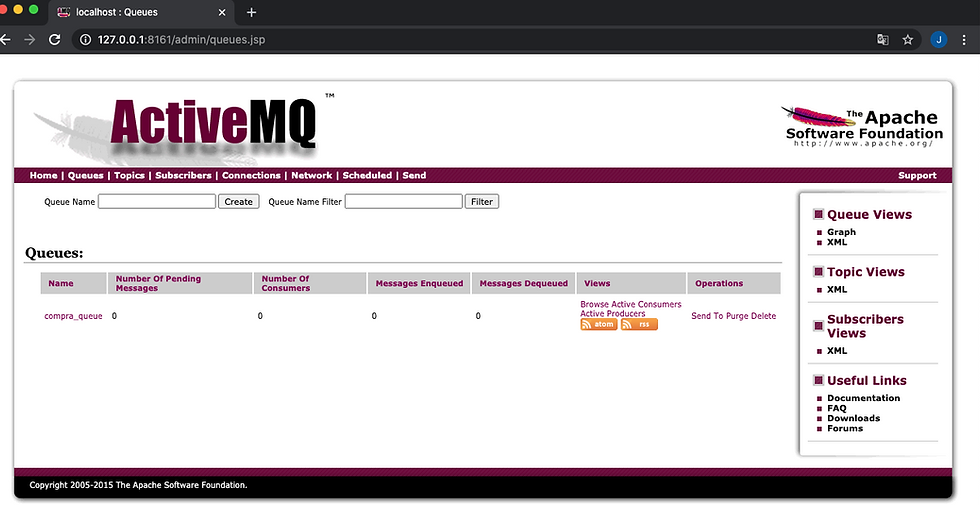
Access the ActiveMQ console again and you will be able to see the message log that was sent to the queue.

The Number of Consumers column is the number of consumers in the queue, which in this case is just 1. The Messages Enqueued column shows the number of messages that were sent and, finally, the Messages Dequeued column is the number of messages that were removed from the queue .
Here I have a SpringBoot project with ActiveMQ repository: https://github.com/jpjavagit/jms-active-mq. It's worth checking out!
Books to study and read
If you want to learn more about and reach a high level of knowledge, I strongly recommend reading the following book(s):
Spring Microservices in Action is a book that covers the principles of microservices using Spring, Spring Boot applications using Spring Cloud, resiliency, how to deploy and real-life examples of good development practices
Spring MVC Beginner's Guide: Beginner's Guide is a book covering fundamental Spring concepts such as architecture, request flows, Bean validation, how to handle exception flows, using REST and Ajax, Testing and much more. This book is an excellent choice for anyone wanting to learn more about the fundamentals of Spring. Spring is a Java Framework containing different projects, Spring MVC being one of them. By acquiring a good Spring MVC foundation, you will be able to tackle challenges using any Spring Framework project.
Learn Microservices with Spring Boot: A Practical Approach to RESTful Services using RabbitMQ, Eureka, Ribbon, Zuul and Cucumber is a book covers the main features of the Spring ecosystem using Spring Boot, such as creating microservices, event-based architecture, using RabbitMQ as a messaging feature, creating RESTful services and much more. This book is an excellent choice for anyone who wants to learn more about how Spring Boot and it's features.
Well that’s it, I hope you enjoyed it!


Comments