First steps with DBT - Data Build Tool
- JP

- 15 de dez. de 2022
- 7 min de leitura
DBT has been used by a lot of companies on Data area and I believe that we can extract good insights in this post about it. That's going to be a practical post showing how DBT works it and hope you guys enjoy it.

What's DBT?
DBT means Data Build Tool and enables teams to transform data already loaded in their warehouse with simple select statements. DBT does the T in ELT processes, in the other words, he doesn't work to extract and load data but he's useful to transform it.
Step 1: Creating a DBT Project
Now, we're assume that DBT is already installed but if not, I recommend see this link.
After DBT installed you can create a new project using CLI or you can clone this project from the DBT Github repository.
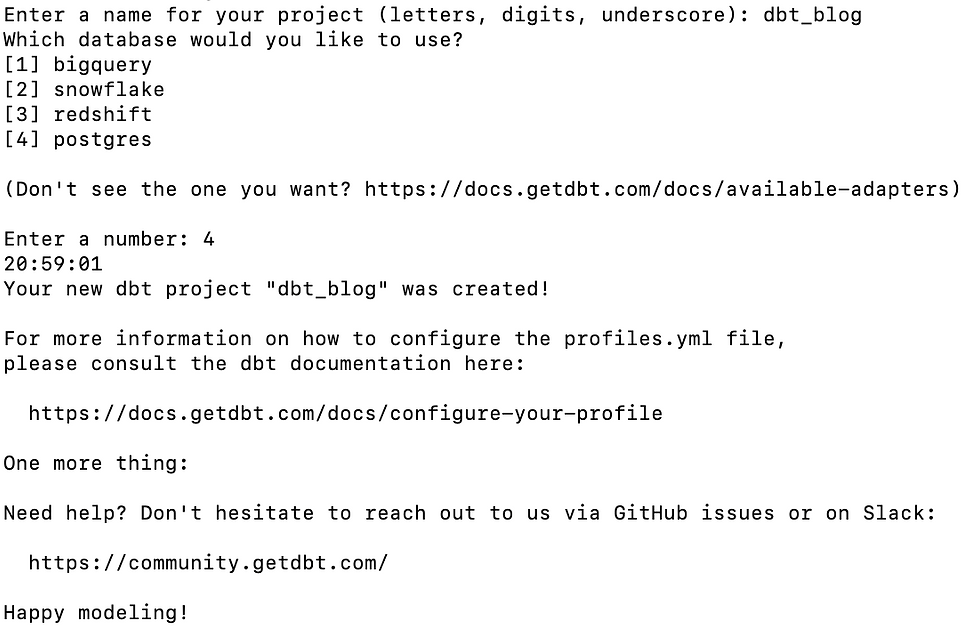
Here for this post we're going to use CLI mode to create our project and also to complete the next steps. To create a new project, run the command below.
dbt initAfter running this command, you need to type the project's name and which warehouse or database you're going to use like the image below.
For this post, we're going to use postgres adapter. It's very important that you have a postgres database already installed or you can up a postgres image using docker.
About adapters, DBT supports different of them and you can check here.
I created a table structure and also loaded it with data simulating data from a video platform called wetube and we're going to use them to understand how DBT works it. Follow the structure:

Step 2: Structure and more about DBT
After running dbt init command to create the project, a structure of folders and files below will be created.
I won't talk about the whole directories of project but I'd like to focus in two of them.

Sources
Sources are basically the data already loaded into your warehouse. In DBT process, sources have the same meaning of raw data.
There's no folders representing source data for this project but you need to know about this term because we're going to set up tables already created as sources for the next sections.
Seeds
Seeds is an interesting and useful mechanism to load static data into your warehouse through CSV files. If you want to load these data you need to create a CSV file on this directory and run the command below.
dbt seedFor each field on CSV file, DBT will infer their types and create a table into warehouse or database.
Models
DBT works with Model paradigm, the main idea is that you can create models through the transformation using SQL statements based on tables sources or existing models
Every SQL file located in your model folder will create a model into your warehouse when the command below runs.
dbt runRemember that a model can be created through a source or another model and don't worry about this, I'll show you more details about it.
Step 3: Setting up database connection
After project already created, we need to set up our database's connection and here at this post, we're going to use postgres as database.
After initialize the project a bunch of files are created and one of them is called profiles.yml.
profiles.yml file is responsible to control the different profiles to the different database's connection like dev and production environment. If you've noticed, we can't see this file on the image above because this file is created outside of project to avoid sensitive credentials. You can find this file in ~/.dbt/ directory.

If you note, we have one profile named dbt_blog and a target called dev, by default the target refer to dev with the database's connection settings. Also, It's possible to create one or more profiles and targets, it enables working with different environments.
Another important detail is that dbt_blog profile should be specified on dbt_project.yml file as a default profile. For the next sections, we'll discuss what and how dbt_project.yml file works it.
Step 4: Creating dbt_project.yml file
Every DBT project has a dbt_project.yml file, you can set up informations like project name, directories, profiles and materialization type.
name: 'dbt_blog'
version: '1.0.0'
config-version: 2
profile: 'dbt_blog'

model-paths: ["models"]
analysis-paths: ["analyses"]
test-paths: ["tests"]
seed-paths: ["seeds"]
macro-paths: ["macros"]
snapshot-paths: ["snapshots"]

target-path: "target"  # directory which will store compiled SQL files
clean-targets:         # directories to be removed by `dbt clean`
  - "target"
  - "dbt_packages"

models:
  dbt_blog:
    # Config indicated by + and applies to all files under models/example/
    mart:
      +materialized: table
Note that profile field was set up as the same profile specified on profiles.yml file and another important detail is about materialized field. Here was set up as a "table" value but by default, is a "view".
Materialized fields allows you to create models as a table or view on each run. There are others type of materialization but we won't discuss here and I recommend see dbt docs.
Step 5: Creating our first model
Creating first files
Let's change a little and let's going to create a sub-folder on model directory called mart and inside this folder we're going to create our .SQL files and also another important file that we don't discuss yet called schema.yml.
Creating schema file
Schema files are used to map sources and to document models like model's name, columns and more.
Now you can create a file called schema.yml e fill up with these informations below.
version: 2

sources:
  - name: wetube
    tables:
      - name: account
      - name: city
      - name: state
      - name: channel
      - name: channel_subs
      - name: video
      - name: video_like
      - name: user_address

models:
  - name: number_of_subs_by_channel
    description: "Number of subscribers by channel"
    columns:
      - name: id_channel
        description: "Channel's ID"
        tests:
          - not_null
      - name: channel
        description: "Channel's Name"
        tests:
          - not_null
      - name: num_of_subs
        description: "Number of Subs"
        tests:
- not_nullSources: At sources field you can include tables from your warehouse or database that's going to be used on model creation.
models: At models field you can include the name's model, columns and their description
Creating a model
This part is where we can create SQL scripts that's going to result in our first model.
For the first model, we're going to create a SQL statement to represent a model that we can see the numbers of subscribers by channel. Let's create a file called number_of_subs_by_channel.sql and fill up with these scripts below.
with source_channel as (
    select * from
        {{ source('wetube', 'channel') }}
),

source_channel_subs as (
    select * from
        {{ source('wetube','channel_subs') }}
),

number_of_subs_by_channel as (
    select
        source_channel.id_channel,
        source_channel.name,
        count(source_channel_subs.id_subscriber) num_subs
    from source_channel_subs
       inner join source_channel using (id_channel)
    group by 1, 2
)

select * from number_of_subs_by_channel
Understanding model creation
Note that we have multiple scripts separated by common table expression (CTE) that becomes useful to understand the code.
DBT enables using Jinja template {{ }} bringing a better flexibility to our code.
The usage of keyword source inside Jinja template means that we're referring source tables. To refer a model you need to use ref keyword.
The last SELECT statement based on source tables generates the model that will be created as table in the database.
Running our first model
Run the command below to create our first model
dbt runOutput:

Creating another model
Imagine that we need to create a model containing account information and it's channels. Let's get back to schema.yml file to describe this new model.
- name: account_information
  description: "Model containing account information and it's channels"
  columns:
    - name: id_account
      description: "Account ID"
      tests:
        - not_null
    - name: first_name
      description: "First name of user's account"
      tests:
        - not_null
    - name: last_name
      description: "Last name of user's account"
      tests:
        - not_null
    - name: email
      description: "Account's email"
      tests:
        - not_null
    - name: city_name
      description: "city's name"
      tests:
        - not_null
    - name: state_name
      description: "state's name"
      tests:
        - not_null
    - name: id_channel
      description: "channel's Id"
      tests:
        - not_null
    - name: channel_name
      description: "channel's name"
      tests:
        - not_null
    - name: channel_creation
      description: "Date of creation name"
      tests:
        - not_null
Now, let's create a new SQL file and name it as account_information.sql and put scripts below:
with source_channel as (
    select * from
        {{ source('wetube', 'channel') }}
),

source_city as (
    select * from
        {{ source('wetube','city') }}
),

source_state as (
    select * from
        {{ source('wetube','state') }}
),

source_user_address as (
    select * from
        {{ source('wetube','user_address') }}
),

source_account as (
    select * from
        {{ source('wetube','account') }}
),

account_info as (
    select
        account.id_user as id_account,
        account.first_name,
        account.last_name,
        account.email,
        city.name as city_name,
        state.name as state_name,
        channel.id_channel,
        channel.name as channel,
        channel.creation_date as channel_creation
    FROM source_account account
       inner join source_channel channel on (channel.id_account = account.id_user)
       inner join source_user_address user_address using (id_user)
       inner join source_state state using (id_state)
       inner join source_city city using (id_city)
)

select * from account_info
Creating our last model
For our last model, we going to create a model about how many likes has a video. Let's change again the schema.yml to describe and to document our future and last model.
- name: total_likes_by_video
  description: "Model containing total of likes by video"
  columns:
    - name: id_channel
      description: "Channel's Id"
      tests:
        - not_null
    - name: channel
      description: "Channel's name"
      tests:
        - not_null
    - name: id_video
      description: "Video's Id"
      tests:
        - not_null
    - name: title
      description: "Video's Title"
      tests:
        - not_null
    - name: total_likes
      description: "Total of likes"
      tests:
        - not_null
Name it a file called total_likes_by_video.sql and put the code below:
with source_video as (
    select * from
        {{ source('wetube','video') }}
),

source_video_like as (
    select * from
        {{ source('wetube','video_like') }}
),

source_account_info as (
    select * from
        {{ ref('account_information') }}
),

source_total_like_by_video as (

    select source_account_info.id_channel, source_account_info.channel,
        source_video.id_video, source_video.title, count(*) as total_likes
    FROM source_video_like
        inner join source_video using (id_video)
        inner join source_account_info using (id_channel)
    GROUP BY source_account_info.id_channel,
             source_account_info.channel,
             source_video.id_video,
             source_video.title
    ORDER BY  total_likes DESC
)

select * from source_total_like_by_video
Running DBT again
After creation of our files, let's run them again to create the models
dbt runOutput

The models were created in the database and you can run select statements directly in your database to check it.

Model: account_information

Model: number_of_subs_by_channel

Model: total_likes_by_video

Step 6: DBT Docs
Documentation
After generated our models, now we're going to generate docs based on these models. DBT generates a complete documentation about models and sources and their columns and also you can see through a web page.
Generating docs
dbt docs generateRunning docs on webserver
After docs generated you can run command below to start a webserver on port 8080 and see the documentation locally.
dbt docs serve


Lineage
Another detail about documentation is that you can see through of a Lineage the models and it's dependencies.


Github code
You can checkout this code through our Github page.
Cool? I hope you guys enjoyed it!