Getting started using Terraform on AWS
- JP

- 6 de out. de 2022
- 6 min de leitura
Atualizado: 30 de dez. de 2024

Terraform is a IaC (Infrastructure as Code) tool that makes it possible to provision infrastructure in cloud services. Instead of manually creating resources in the cloud, Terraform facilitates the creation and control of these services through management of state in a few lines of code.
Terraform has its own language and can be used independently with other languages isolating business layer from infrastructure layer.
For this tutorial, we will create an S3 Bucket and an SQS through Terraform on AWS
Terraform Installation
For installation, download the installer from this link according to your operating system.
AWS Provider
We'll use AWS as a provider. Thus, when we select AWS as a provider, Terraform will download the packages that will enable the creation of specific resources for AWS.
To follow the next steps, we hope you already know about:
AWS Credentials
Your user already has the necessary permissions to create resources on AWS
Authentication
As we are using AWS as provider, we need to configure Terraform to authenticate and then create the resources. There are a few ways to authenticate. For this tutorial, I chose to use one of the AWS mechanisms that allows you to allocate credentials in a file in the $HOME/.aws folder and use it as a single authentication source.
To create this folder with the credentials, we need to install the AWS CLI, access this link and follow the installation steps.
This mechanism avoids using credentials directly in the code, so if you need to run a command or SDK that connects to AWS locally, these credentials will be loaded from this file.
Credentials settings
After installing the AWS CLI, open the terminal and run the following command:
aws configureIn the terminal itself, fill in the fields using your user's credentials data:

After filling in, 2 text files will be created in the $HOME/.aws directory
config: containing the profile, in this case the default profile was created
credentials: containing own credentials
Let's change the files to suit this tutorial, change the config file as below:
[profile staging]
output = json
region = us-east-1
[default]
output = json
region = us-east-1
In this case, we have 2 profiles configured, the default and staging profile. Change the credentials file as below, replacing it with your credentials.
[staging]
aws_access_key_id = [Access key ID]
aws_secret_access_key = [Secret access key]
[default]
aws_access_key_id = [Access key ID]
aws_secret_access_key = [Secret access key]
Creating Terraform files
After all these configurations, we will actually start working with Terraform. For this we need to create some base files that will help us create resources on AWS.
1º Step: In the root directory of your project, create a folder called terraform/
2º Step: Inside the terraform/ folder, create the files:
vars.tf
3º Step: Create another folder called staging inside terraform/
4º Step: Inside the terraform/staging/ folder create the file:
vars.tfvars
Okay, now we have the folder structure that we will use for the next steps.
Setting up Terraform files
Let's start by declaring the variables using the vars.tf file.
vars.tf
In this file is where we're going to create the variables to be used on resources and bring a better flexibility to our code. We can create variables with a default value or simply empty, where they will be filled in according to the execution environment, which will be explained later.
variable "region" {
  default = "us-east-1"
  type = "string"
}

variable "environment" {
}
We create two variables:
region: Variable of type string and its default value is the AWS region in which we are going to create the resources, in this case, us-east-1.
environment: Variable that will represent the execution environment
staging/vars.tfvars
In this file we are defining the value of the environment variable previously created with no default value.
environment = "staging"This strategy is useful when we have more than one environment, for example, if we had a production environment, we could have created another vars.tfvars file in a folder called production/.
Now, we can choose in which environment we will run Terraform. We'll understand this part when we run it later.
main.tf
Here is where we'll declare resources such as S3 bucket and SQS to be created on AWS.
Let's understand the file in parts. In this first part we're declaring AWS as a provider and setting the region using the variable already created through interpolation ${..}.
Provider
provider "aws" {
  region  = "${var.region}"
}
Creating S3 Bucket
To create a resource via Terraform, we always start with the resource keyword, then the resource name, and finally an identifier.
resource "name_resource" "identifier" {}In this snippet we're creating a S3 Bucket called bucket.blog.data, remember that Bucket names must be unique.
The acl field defines the Bucket restrictions, in this case, private. The tags field is used to provide extra information to the resource, in this case it will be provide the value of the environment variable.
resource "aws_s3_bucket" "s3_bucket" {
  bucket = "bucket.blog.data"
  acl = "private"

  tags = {
    Environment = "${var.environment}"
  }
}
Creating SQS
For now, we'll create an SQS called sqs-posts. Note that resource creation follows the same rules as we described earlier.
For this scenario, we set the delay_seconds field that define the delay time for a message to be delivered.
More details here.
resource "aws_sqs_queue" "sqs-blog" {
  name = "sqs-posts"
  delay_seconds = 90
  tags = {
    Environment = "${var.environment}"
  }
}
Running Terraform
1º Step : Initialize Terraform
Open the terminal and inside terraform/ directory, run the command:
terraform initConsole message after running the command.

2º Step: In Terraform you can create workspaces. These are runtime environments that Terraform provides and bringing flexibility when it's necessary to run in more than one environment. Once initialized, a default workspace is created.
Try to run the command below and see which workspace you're running.
terraform workspace list
For this tutorial we will simulate a development environment. Remember we created a folder called /staging ? Let's getting start using this folder as a development environment. For that, let's create a workspace in Terraform called staging as well.
If we had a production environment, a production workspace also could be created.
terraform workspace new "staging"
Done, a new workspace called staging was created!
3º Step: In this step, we're going to list all existing resources or those that will be created, in this case, the last option.
terraform plan -var-file=staging/vars.tfvarsThe plan parameter makes it possible to visualize the resources that will be created or updated, it is a good option to understand the behavior before the resource is definitively created.
The second -var-file parameter makes it possible to choose a specific path containing the values of the variables that will be used according to the execution environment. In this case, the /staging/vars.tfvars file containing values related to the staging environment.
If there was a production workspace, the execution would be the same, but for a different folder, got it?
Messages console after running the last command using plan parameter.

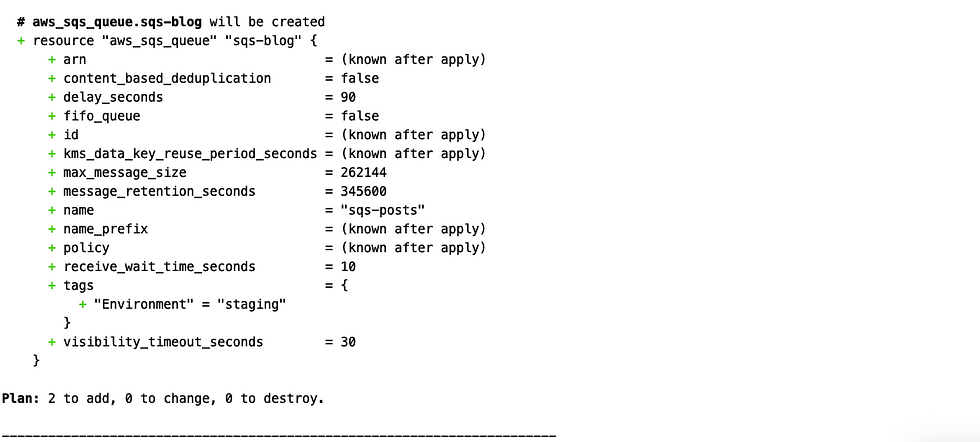
Looking at the console, note that resources earlier declared will be created:
aws_s3_bucket.s3_bucket
aws_sqs_queue.sqs-blog
4º Step: In this step, we are going to definitely create the resources.
terraform apply -var-file=staging/vars.tfvarsJust replace plan parameter with apply, then a confirmation message will be shown in the console:

To confirm the resources creation, just type yes.

That's it, S3 Bucket and SQS were created! Now you can check it right in the AWS console.
Select workspace
If you need to change workspace, run the command below selecting the workspace you want to use:
terraform workspace select "[workspace]"Destroying resources
This part of the tutorial requires a lot of attention. The next command makes it possible to remove all the resources that were created without having to remove them one by one and avoiding unexpected surprises with AWS billing.
terraform destroy -var-file=staging/vars.tfvars
Type yes if you want to delete all created resources.
I don't recommend using this command in a production environment, but for this tutorial it's useful, Thus, don't forget to delete and AWS won't charge you in the future.
Conclusion
Terraform makes it possible to create infrastructure very simply through a decoupled code. For this tutorial we use AWS as a provider, but it is possible to use Google Cloud, Azure and other cloud services.
Books to study and read
If you want to learn more about and reach a high level of knowledge, I strongly recommend reading the following book(s):
Terraform: Up & Running: Writing Infrastructure as Code is a book focused on how to use Terraform and its benefits. The author make comparisons with several other IaC (Infrastructure as code) tools such as Ansible and Cloudformation (IaC native to AWS) and especially how to create and provision different resources for multiple cloud services. Currently, Terraform is the most used tool in software projects for creating and managing resources in cloud services such as AWS, Azure, Google Cloud and many others. If you want to be a complete engineer or work in the Devops area, I strongly recommend learning about the topic.
AWS Cookbook is a practical guide containing 70 familiar recipes about AWS resources and how to solve different challenges. It's a well-written, easy-to-understand book covering key AWS services through practical examples. AWS or Amazon Web Services is the most widely used cloud service in the world today, if you want to understand more about the subject to be well positioned in the market, I strongly recommend the study.
Well that’s it, I hope you enjoyed it!